


Learn how to perform day-to-day tasks such as import SMDR/CDR formats in the application via a supplier account, add a sale to a customer account and more
Aim
The aim of this part of the guide is to:
- Import SMDR/CDR formats in the portal
- Associate a SMDR/CDR format with a customer Service Number (SN)
- Add a sale to a customer account
- Import a voice price list
- Add a new SN and associate a new voice price list with a customer account
- Show how to give free calls to customers
- Get subscriptions and packages to bill in advance
- Enter a data package and link it to a customer
- Differentiate between local and national calls
- Create a package for mobile phones such as an SMS package and link it to a customer
- Bill a SMDR/CDR format not using price lists but the price information contained in the file
- Show how SMDR/CDR reconciliation is done
Import a New SMDR/CDR Format
It is only necessary to import SMDR/CDR formats once, as once the parameters that characterise the various SMDR/CDR formats have been identified such as the format of the duration field whether this shows up as seconds or minutes, TelecomBilling.Net will then retrieve the data automatically or in the case of SMDR/CDR files, they will just need to be uploaded to their respective formats in the SMDR/CDR Formats pages (under ‘Settings’ or in a supplier account).
The steps to follow in order to import a new SMDR/CDR format is as follows:
1. Click on ‘Suppliers’ in the ‘Home’ menu
2. Open supplier number ‘Suppl_0’, another existing supplier account or create a new supplier
3. Go to menu at top left hand corner. Select ‘CDR formats’
4. You are presented with a page similar to the one in the picture below. Add a new format or modify an existing one.

A number of parameters have to be entered for each SMDR/CDR format. This will help TelecomBilling.Net understand how the SMDR/CDR type is formatted. These are:
- 1. Identify if the format is for voice, data or both. The guidance that follows will be for a format that uses both types.
- 2. Give it a name. This name is automatically used by TelecomBilling.Net to identify the CDR data or files in various places in the portal such as the CDR Data page.
- 3. & 11. The format of the date and time fields, ISO dates either of the basic type (e.g., yyyymmddhhmmss) or extended that use a separator between the year, month and day, hour, minutes and seconds. It is important to ensure that the date and time formats identified here are correct as this will ensure that errors are avoided and ensure formats are changed in the portal if they have changed in the CDR data. Another important aspect is to correctly identify if months and hours should be represented as capital H or capital M. For instance for the time part ‘HH’ would mean 24 hrs and ‘mm’, 12hrs time formats. The tricky part in dates usually is the months, which should be mm if March (e.g.) is given as ‘3’ and MM for ’03’. if the date format sought is for a database source (MySQL or MsSQL), write ‘dd/MM/yyyy’ and not ‘yyyy-mm-dd’. If you identified any one of the formats on one of the lines below, the format you identified along with the other 3 formats on a line will be tested in order to format date:
- ‘yyyy-MM-dd’, ‘yyyy/MM/dd’, ‘yyyyMMdd’, ‘yyyy-mm-dd’, ‘yyyy/mm/dd’, ‘yyyymmdd’
- ‘dd-MM-yyyy’, ‘dd-mm-yyyy’, ‘dd-MM-yy’, ‘dd-mm-yy’
- ‘dd/MM/yyyy’, ‘dd/mm/yyyy’, ‘dd/MM/yy’, ‘dd/mm/yy’
- So for instance if you identified that the date format follows the pattern ‘yyyy-MM-dd’ and a date can’t be extracted then all six patterns on that line will be tested: ‘yyyy-MM-dd’, ‘yyyy/MM/dd’, ‘yyyyMMdd’, ‘yyyy-mm-dd’, ‘yyyy/mm/dd’, and ‘yyyymmdd’. Always check logs for any issues with formatting dates and times. Important: We cannot stress the notion that even if your system did not generate an error on dates and if the date format was incorrectly identified then the system is likely to have mis-formatted the dates.
- More information about date and time format strings can be found below:
- 4. Location of the date/time. The date cannot contain a value for the time if it is located in the name of the file or in the header row.
- 5. If a column for the purchase price of call is found in a CDR file/table/url, the portal will use this when working out your profit and loss reports as explained in the Billing and Reports page.
- 6. Identify the strings that constitute a valid call that should be billed. Calls that do not include these flags will not be billed. In the wizard, identify the column that holds this information by selecting a column header for the marker called ‘SUCCESSFULLCALLFLAGFIELD’ and associate it with a column in the CDR format. It is also possible to indicate whether calls should be charged if the column contains no value or if value is greater than 0. The CDR will not be rated if the field contains a value or if the field holds 0’s.
- 7. If the CDR data does not have line returns, write the number of columns in the CDR data. Write ‘0’ if the data does have line returns.
- 8. Field where a note can be entered about the CDR format.
- 9. Define Regular Expressions (RegEx) that will be applied to each CDR line. This is useful for cases where certain operations need to be performed on CDR lines such as swapping or removing certain characters in your CDR data. More information about RegEx expressions here.
- 10. Select how the CDR data will be rated. If selecting the second or third options, the following need to be identified in the field mapping stage of the import wizard: a quantity, sales price or a purchase price and a margin multiplier. If one of these options is selected, one or more price lists of any kind can be associated with the customer’s SNs just as long as the CDR data holds that information so that the rating can be done correctly. A margin multiplier has to be identified if the 2nd option is selected.
- A purchase price column has been identified in 5 above or the CDR is rated using a purchase or sales price value:
- 11. Identify if all cost values are given as hundredths or not, i.e., as pence or pounds, cents or dollars.
- You did not identify a purchase/sales price column:
- 12. Determine how billing is to be carried out for this CDR format: on the customers’ service numbers, on the customers’ account codes and show their service numbers on invoices or on the customers’ account codes and show their account codes on invoices
- 13. Identify how calls are rated: via the call types only or using the number called only or a combination of number called and call types. Rating using the numbers called uses the dialling codes found in a price list; rating using only the call types uses the call types found in the CDR data matched against the call types found in a price list and call settings. To use the number called and call type as a combination, tick this option and then identify a call type column in the field mapping stage of the CDR format importation process. The call type countries have to match between the values found in a price list and the ones in the voice settings for this to work.
- 14. Identify the time format (e.g. hh:mm:ss, h:m:s, h.m.s,…)
- 15. Identify the separator that is used in the date and time strings if these appear in the same field. Select ‘>Not applicable<‘ if date and time are in separate fields. Select ‘No separator’ if the date and time is one block with no separator.
- 16. Specify if the duration of calls is given in seconds, minutes, a format hh:mm:ss, in second decimals or start and end times of the call are given. Note that if the field in the CDR data holds values that are numeric and do not follow the pattern that you gave here, these values will be deemed to be seconds. For durations that follow ISO-compliant date formats, see point #3 above for more on how to identify these formats.
- 17. Specify what is the CDR field for the call types, as was explained previously about the Voice settings. The algorithm that pulls out the cost of the calls made by your customers requires matching a call type field from your price lists and a matching field from your CDRs. The use of call types is not necessary and can be ignored if you are happy to rate calls using the number called only. Using call types is useful in the following cases:
- CDR data use dial classes If two or more operators make use of number portability and therefore need to be differentiated.
- When different operators exist in a country and operate with the same dialling codes. In Belgium, for instance, for a time there existed 2 phone-number-issuing operators that used the same established regional dialling codes. They each had their own rates when calls are placed to numbers that fall within their network. The only way to differentiate calls that were made to these same regional codes was to use the country field in the carriers’ CDRs and look for their company names, hence the need to use not only the dialling code but also the destination field (or any other field) to match a call and its cost. Select ‘Other – Select in wizard’ if you wish to directly identify this column in the wizard rather than use one of the default fields given in the drop-down box.
- If you selected the first option in point ’12’ above and do not use call types, select the format numbers called have (very important to ensure a correct match and to obtain the correct costing of your calls). This option essentially means the portal needs to know if numbers called start with the country codes or not. If national numbers have a fixed length, add all possible lengths in the drop-down menu. Leading zeros in front of a national number called do not count towards the total length of a number.
- 18. Select how IP addresses are formatted in the CDR files/tables/web pages.
- 19. Select if the operator masks numbers called.
- 20. Select if for calls of zero duration, certain costs have to be computed.
- 21. Tick this option if numbers called for this CDR are also SNs and to make calls to these SNs free.
- 22. Select if calls are split as calls outbound and inbound. Additionally, identify if these are on the same line or are split over 2 lines. If the former is the case, you will be taken to the wizard where inbound and outbound parts of the calls need to be identified. So for instance ‘Number called’ will be split into ‘Outbound number called’ and ‘Inbound number called’. If calls are on 2 lines, strings that identify the outbound and inbound parts are normally required and a column will have to be identified in the wizard with the flag ‘OUTBOUNDINBOUNDFLAGFIELD’. In this last case, calls will be split as 2 calls: one call for the outbound part of the call and one for the inbound part of the call. If no strings are identified then inbound and outbound parts of the calls are deemed to be contained in 2 columns: one column for ‘inbound originating number/outbound number called’ and one column that holds ‘inbound number called/outbound originating number’.
- Please note the concept of incoming/outgoing calls is used by the portal in a very broad way and can be used for cases where strictly no incoming and outgoing calls exist. This makes it possible to configure any type of billing model. For example in VoIP telephony, if you have a type of CDR that includes a column with the CLI (DDI, DID) and another with the IP address that made the call and you want the program to manage both, identify one column as the incoming number and another as the outgoing number. This will allow the program to switch from one column to the other according to the needs of the CDR, for example in the case where some of the lines in the CDR have a blank in place for the CLI in the first column and the IP address should be used from the second column.
- You have ticked parameter #22:
- 23. Determine whether incoming and outgoing parties will be billed separately, i.e. as two calls or one.
- You have checked the first option of parameter #23:
- 24. The portal will ask you to identify the fields that correspond to the incoming and outgoing parts of the calls later in the wizard. Identify here which party will be charged (incoming or outgoing) and which numbers should appear on the invoices as called and calling/originating numbers. For the 3rd radio button option, i.e. ‘Rate using the inbound number called and fall back on the outbound number called if the inbound number is empty’, the following fields are typically selected in the field mapping part of the wizard:
- Inbound/outbound originating number or inbound originating number and outbound originating number, and
- Inbound number called, and
- Outbound number called
- You did not tick parameter #22:
- 25. What recurrence do the files use.
- 26. How should the portal behave if no bandwidth consumption is found for a period of time for this CDR.
- 27. How is the bandwidth given: In bytes, MB or GB.
- 28. Identify how downloaded/uploaded bytes are displayed, ie, is there a single value for both or separate columns for downloads and anther column for uploaded traffic.
- 29. Select whether the CDR data is located is a text file, in a database or on a Web page (HTTP GET/POST).
Click Next. You will be asked to identify the type of source used: text, database or web page. Click Next. You are taken to the following screen:

5. Mapping of fields
TelecomBilling.Net needs to know what column is associated with what piece of information. For instance, the second column above is the outbound number calling. Select ‘Outbound number calling’ from the drop -down box and click on the header of the second column. Perform the same thing for all the other columns where relevant. When working with Voice/data CDR formats, the SN corresponds to the originating number (inbound or outbound if relevant) and in Service CDR formats, the words Service Numbers are used.
6. Click ‘Next’
- Next screen enables you to define the Quality of Service (QoS) parameters for the new format: Define the columns where such information as ‘Bid’, ‘Seizure’ or ‘Quantity of circuits available’,… are located and the values that the parameters have in the second part of this screen. Click ‘Next’. You may also skip this part by clicking ‘Next’ directly.
- Click ‘Finish’. A dialogue box shows: select ‘OK’ to go to a newly created folder where SMDR/CDR fiels need to be placed.
7. If database was ticked, click ‘Next’.
- In the next screen, select the database type and specify the connection string of the database TelecomBilling.Net needs to connect to. Click on the button to test the connection and finally select the table where the SMDR/CDR records are located.
- Click ‘Next’. The following steps are similar to the ones described for importing SMDR/CDR text files above.
- Make sure you identify a column that holds the table’s primary numeric key as the portal requires such a field to keep track of the data it analyses.
8. If an HTTP POST/GET request was ticked, click ‘Next’.
- Select the type of separator used in the data.
- Select up to which line data should be ignored.
- Type the URL to retrieve in the next box. Click OK. The content of the page called will show in the text box underneath.
- Click ‘Next’. The following steps are similar to the ones described for importing SMDR/CDR files above.
9. If a Webhook is selected, click ‘Next’.
- Select the type of separator used in the files.
- Identify a server query URI if the provider allows query Webhooks and click OK. Ensure the server URI has a parameter that holds the client URI (only the first 50 records will be displayed). Alternatively submit the Client URI to your provider and paste sample data in text box and click ‘Next’.
Associate a New SMDR/CDR Format with a Customer Service Number (SN)
Once a SMDR/CDR format has been modified or added, it needs to be linked to a customer and their SNs (i.e. numbers calling). For this, follow these simple steps:
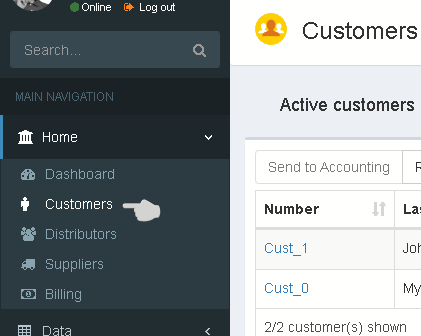
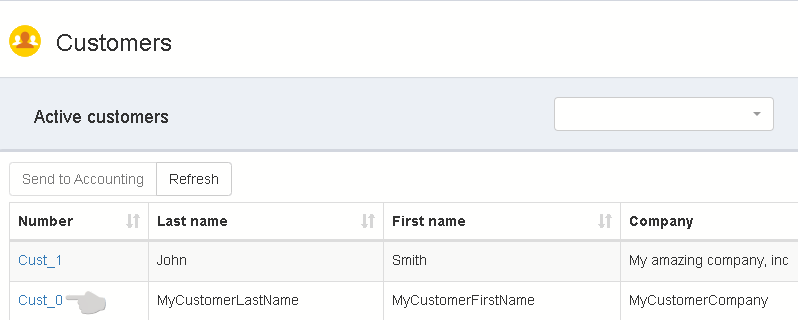
1. Click on ‘Customers’ in the ‘Home’ menu.
2. Double-click on a customer or create a new one.
3. Go to the customer account > Menu above main table > Service numbers.
4. You are then presented with the following page:
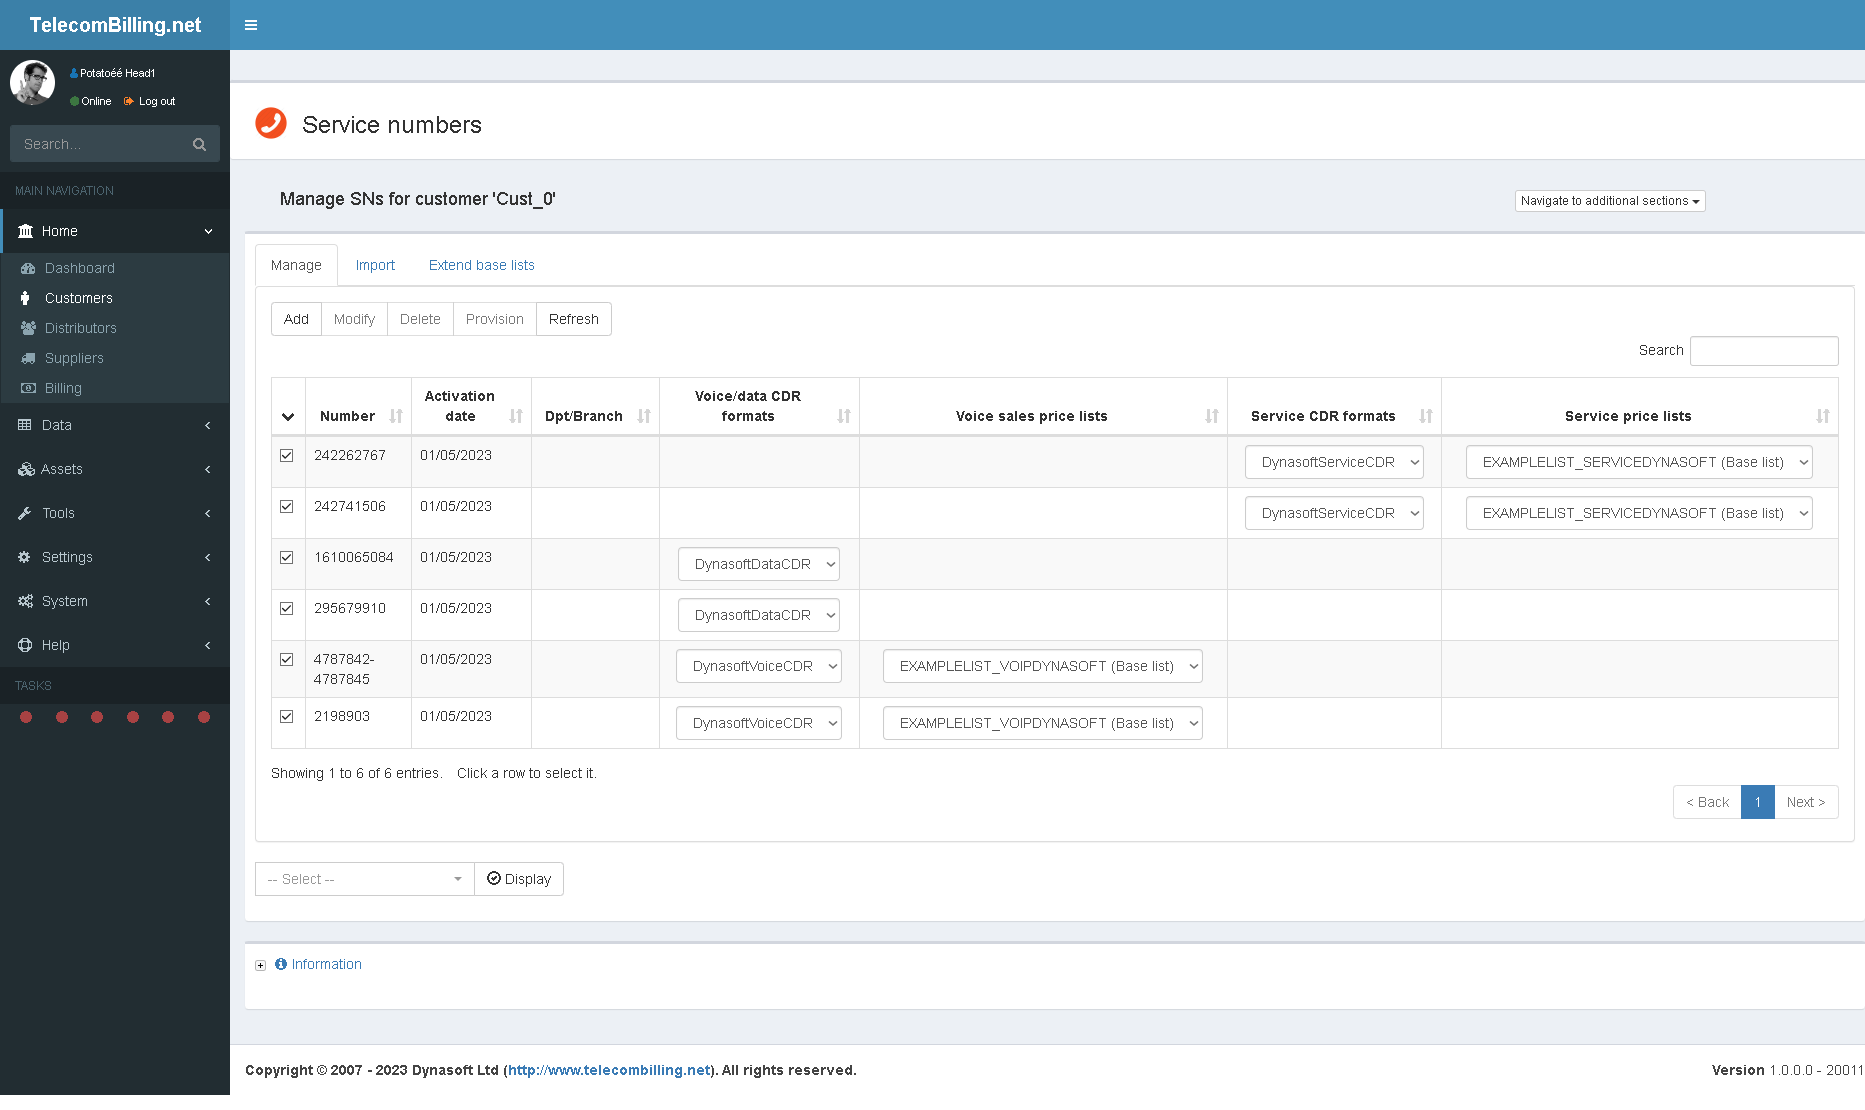
Open an existing service number or click add to add a new one. A number of parameters have to be identified and linked together (from top to bottom):
- Mark the SN as active or not. A non-active SN will be ignored by the system
- A type of SN: simple number, regular expression, range of numbers (i.e., all numbers included between a lower number and a top number), DDI/DID, SIM, CLI. TelecomBilling.Net will extract the SN found in the SMDR/CDR using the expression entered here.
- The number
- The numbers excluded from a range of numbers if range is what you selected as the type of number
- A regional dialling code
- A national dialling code
- A start date when this association will start
- An end date after which this association ends
- A department or branch to link this entry with
- A discount (which will be applied as part of a package)
- Voice parameters:
- One or more voice SMDR/CDR format(s)
- One or more sales price list(s)
- One or more purchase price list(s)
- Data parameters:
- One or more data SMDR/CDR format(s)
- Service parameters (click double-arrowed button):
- One or more service SMDR/CDR format(s)
- One or more sales price list(s)
- One or more purchase price list(s)
The benefit of employing associations of SN, rate sheet, start and end dates price lists and SMDR/CDR formats is that it gives the user the best flexibility possible as for instance these can be staggered over time so that one can start as another finishes for the same customer or different customers. When a new price list is entered in the portal it usually is called a base list. To create a customer-specific list from a base list, go to the tab ‘Extend base lists’. Here click a base list and click ‘Extend’. A new list will then show in the Price lists page that will be specific to this customer.
5. Hit the ‘Save’ button to close the form
Add a Sale to a Customer Account
It is possible to add products and services such as phone cards, ADSL connections… that can then be linked to a customer account. Please go to chapter 3.4.2.1 of the manual for a detailed explanation about how to add these to a customer account. Products and services that are not based on SMDR/CDR data are called subscriptions in TelecomBilling.Net. Below is a quick summary:
1. Click on ‘Home’ menu > click on ‘Customers’
2. Double-click customer ‘Cust_0’
3. Go to the menu at top left-hand corner, select ‘Subscriptions and packages’
4. Select ‘Subscriptions’ in ‘Item type’ drop-down box
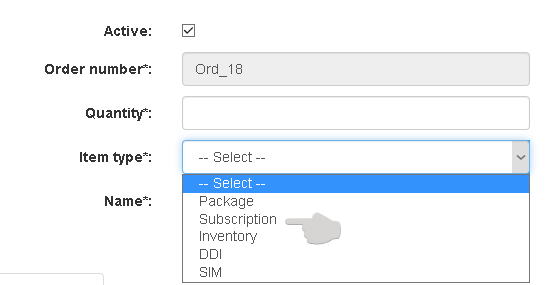
5. Select ‘My Default Subscription1’ in the next drop-down box
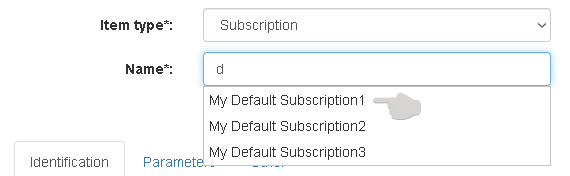
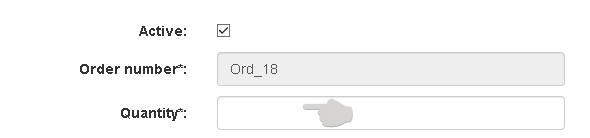
6. Fill in a quantity
7. Identify a start or activation date
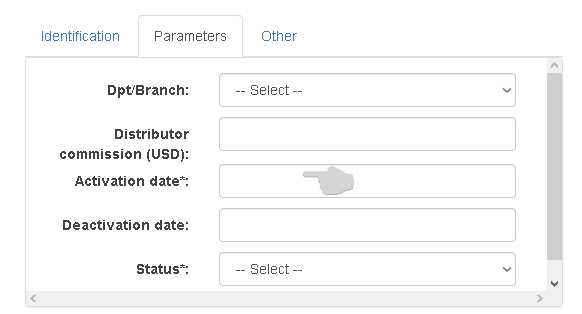
8. Select ‘Order fulfilled’ in Status drop-down box
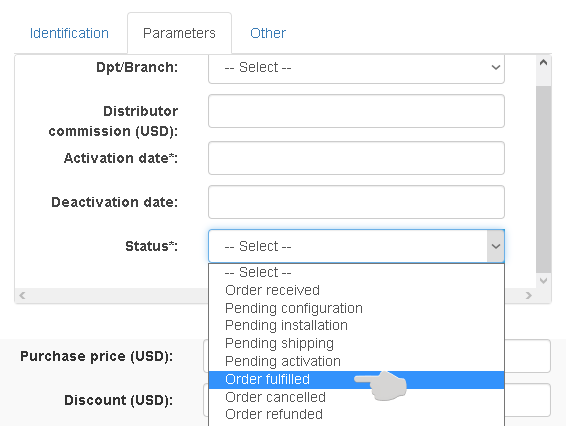
9. Hit the ‘Save’ button at bottom of form
Import a Voice Price List
Importing a price list is a two-stage process: add a reference to the new list and then import its data.
- Go to the ‘Data’ sub-menu
- Click on ‘Price lists’
- Click on ‘Add’ above the main table
- Select the type of list (voice…)
- Enter a name for the price list in text box
- Identify if the price list is a base list (i.e., available to all customers) or specific to a customer
- Select the column separator in the next drop-down box
- Select a file by clicking on the ‘Choose file…’ button underneath
- Click ‘Save’
- Go to the main table and click the newly added list
- Click on ‘Import data’ button above the main table
- You are taken to the wizard for importing price lists
- Click ‘Next’
- Associate each column of relevant data with a header by selecting the headers in the drop-down box above the main table. Each header is explained in chapter 3.5.1 of the manual. The minimum required fields are:
- Dialling code
- Country
- Peak rate
- Off-peak rate
- Weekend rate
- Follow the steps to the end of the wizard and click ‘Finish’
- In addition, in order for a price list to work in the billing, each destination needs to have:
- Call types
- The value ‘OK’ for the field ActivateRoute. This tells the portal that a route is active and can be used when billing.
- The list gets added to the main table
- To access the list details, go to the ‘Price lists details’ menu, under ‘Data’ and click the new list’s name in the main table and select ‘Modify’
Add a New SN and Associate a New Voice Price List with a Customer Account
TelecomBilling.Net stores associations of a customer’s SN and various parameters such as a SMDR/CDR format, sales and purchase price lists, start and end dates, etc…
- Go to the ‘Home’ menu
- Click on ‘Customers’
- Open a customer
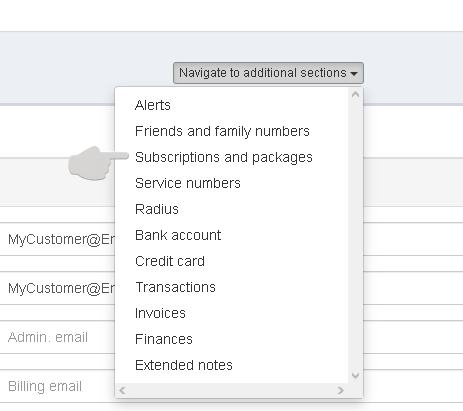
- Go to the menu at top right hand corner, select ‘Service numbers’ (SN)
- Determine of the number is active or not
- Identify the type of SN
- Select an existing DDI or SIM number or write a SN in the form
- Excluded numbers are those numbers that need to be ignored in a range of numbers
- Enter a regional dialling code
- Enter a national dialling code
- Enter the activation date for when the SN will start to run
- Enter a deactivation date, when calls for this SN will stop being billed
- Identify the department or branch that is linked to the SN
- Write a discount value
- Tick one or more voice SMDR/CDR formats to associate with the SN
- Tick one or more purchase price lists for voice services
- Tick one or more sales price lists for voice services
- Click on the ‘Services’ tab to select the services SMDR/CDR formats associated with this SN
- Click ‘Save’
How to give free calls to your customers
There are a number of ways this can be achieved.
- Include the dialling codes or phone numbers in the customer’ price list and indicate 0 in the cost columns (peak rate, off-peak rate,…)
- By adding a zero-cost package
- Click on ‘Assets’ menu > click on ‘Packages’
- Enter a package name, description
- Select the recurrence
- Select the product category
- Add the call types this package covers under ‘Voice parameters’. You might have to add all the call types to cover all of the customer’s calls
- Select the customer type the callees have to belong to in order for the caller to obtain this 0-cost package
- Write 0 in the field for number of minutes/calls/cost of package
- Select if the package is based on minutes, cost or number of calls
- Indicate a purchase price if relevant
- Indicate 0 in the sales price
- Click ‘Save’
- Go to ‘Home’ menu > click on ‘Customers’
- Open a customer
- Go to the menu at top right-hand corner > ‘Subscriptions and packages’
- Select ‘Packages’ in ‘Item type’ drop-down box
- Select the package created previously in the next drop-down box
- Add a quantity in the quantity field
- Select the start and end dates of the package using the date fields
- Select ‘Order fulfilled’ in ‘Status’ drop-down box
- Click ‘Save’
- Click ‘Associated SNs’ for the package newly added
- Tick the SNs required
- Close the form
- By giving free calls to customers who called a number that belongs to another customer who is in the system and whose calls are extracted from the same SMDR/CDR format
- Click on ‘Home’ menu > click on ‘Suppliers’
- Open a supplier account
- Go to their ‘CDR Formats’ page
- Modify an existing SMDR/CDR format or add a new one
- Enter the details associated with the supplier SMDR/CDR format (see chapter 3.4.2.3 in the manual for more) by following all the steps in the wizard
- Make sure you tick ‘Yes’ under step 18
- Complete the wizard to the end
- Close the wizard
All calls made from and to a number that features in this SMDR/CDR format will be free for the caller.
- By giving free calls to customers that are within the same customer group
- Click on ‘Data’ menu > click on ‘Price lists’
- Add a voice price list (see chapter 3.5.1 in the manual for more) with the free destinations
- Close price lists page
- Click on ‘Settings’ menu > Configuration > Options 9 tab, point 9.C
- Define the groups and sub-groups and associate each one with a price list (see chapter 3.3.5 in the manual for more)
- Close Configuration
- Click on ‘Home’ menu > click on ‘Customers’
- Open a customer account
- Go to their service numbers
- Add and link the customer’s SNs with a SMDR/CDR format, start and end dates and sales price list (see chapter 3.4.2.1 in the manual for more)
- Go to the customer’s account, Options 1 tab
- In option 1.A.3 that deals with customer group and sub-group, select the group and sub-group this customer belongs to
- Save customer’s page
When billing is done, the portal will apply the rates in the price list selected instead of the rates from the voice price list provided the callee belongs to the same customer group (and sub-group) as the caller. If no rate is found in the call type price list, it is the rate in the voice price list that will be used. The portal knows which line in the call type price list to use because it uses the call type the normal voice price list brings up and uses that same call type to then apply the rate from the call type price list.
- By combining a purchase price column and call types in SMDR/CDR data, and a margin multiplier and call types in a customer’s price list. With this method, calls that are free need to have a special flag (the call type) that marks them as free in the SMDR/CDR data. TelecomBilling.Net will then extract these calls and multiply the values under the purchase price column (usually 0) by the margin multiplier. The resulting cost of the calls will be zero. More on this in the manual.
Get subscriptions and packages to bill in advance
There are a number of options that need to be set for this to be achieved.
- Tick options ‘1.a’ & ‘1.b’ (subscriptions) and ‘2.c’ & ‘2.g’ (packages) and untick option ‘3.s’ in point ‘8.A.’ in the Configuration page
- From the main customers page (‘Home’ > ‘Customers’), select the customer(s), then reset their subscriptions and packages to the items’ activation dates
- Go to the billing page, select the customers and a start date that is equal or older than the items’ activation dates. Select an end date that is the last date of the billing cycle you wish to bill
- The bills should now show all the periods up to and including the current billing cycle plus one cycle
Note: As you can see TelecomBilling.Net enforces billing cycles scrupulously if point ‘3.s’ above is unticked. This means that if the first period that was billed is not one that matches your items’ activation dates, then the portal will not include them in the invoices. The reason is TelecomBilling.Net assumes you’re trying to bill items twice for the same period which is not allowed when having option ‘3.s’ unticked. To get TelecomBilling.Net to always bill items no matter when they were billed last, untick option ‘3.s’. This way they will always be billed. For more on this please go to our manual, chapter 3.4.2.1.
Enter a data package and link it to a customer
Several steps are required in order to add a package to a customer’s account: create a general package, import a new SMDR/CDR format (if needed), add the customer’s SNs, allocate the package to he customer, link the SNs with the package and finally set some general options in the configuration.
- Go to the ‘Packages’ page under the ‘Assets’ menu
- Enter the various parameters for your new package. Parameters for the data part of the package are reached by clicking on the tab heading ‘Data parameters’
- Next, import a new data SMDR/CDR format by going to a new or existing supplier, or the general page for SMDR/CDR formats under the ‘Settings’ menu
- Open or create a new customer account, then go to their SNs page located in the drop down menu above the fields for a customer account, to the right
- Add the customer’s SNs in this page and link each SN with an activation date, deactivation date, sales and purchase price list(s), link the SN with the newly added SMDR/CDR format(s) and a discount. Click ‘Save’ at bottom
- Go to their ‘Subscriptions and packages’ page under the same drop-down menu
- Add the package to their account from there by selecting it like so: ‘Item type’ > ‘Packages’ > Write one or more letters to bring up the new package
- Click ‘Associated SNs’ by selecting the newly added package to link the required SNs with the new package
- Go to the configuration page, select the options under heading ‘8.A’ relevant to data packages are: 2.c, 2.d, 2.f, 2.h, 2.i and 2.j
- You are now ready to bill data packages from the main billing page (‘Home’ menu)
Differentiate between local and national calls
In many countries, local and national calls are billed using different rates. Local calls are often given away for free. TelecomBilling.Net is able to handle this type of billing scenario. It uses its call types in order to achieve this. There are two ways in which this can be achieved:
- Create a zero cost package and link it to the customer or,
- Identify a call group that holds all the call types that should be free to the phone user. This is covered in this section. Instead of writing a cost for the package simply write 0 for the package’s cost or number of minutes
Here is how to give away free calls using the second method:
- Add the call types that need to be used for local and national calls made, either in the voice settings page under ‘Settings’ or via a supplier account
- Add a call type for local calls under the ‘Call types’ tab of the voice settings page
- Once this has been added, go to the price lists details page to review your price lists. There needs to be a line with rates for the call type that was added. The national dialling code followed by the city or regional code should be used (322, 44207,…)
- When billing, TelecomBilling.Net will then review each number called in the SMDR/CDR data and look for the correct rate by mapping the dialling code called
- An important limitation with this method is that it will only work with calls to and from the same dialling code. For cases where the same number needs to be able to call numbers with different dialling codes, the creation of a package should be considered
Create a package for mobile phones such as an SMS package and link it to a customer
A package needs to be created and linked to a customer. We’ll assume a customer account has been created and their phone numbers haves been added to their account. Follow the steps given below to create the package and link it to this customer.
- Go to ‘Assets’ > ‘Packages’
- Click ‘Add’
- Go to the controls on the form and fill in the form: package name, a package description, the recurrence i.e. it’s billing cycle, etc…
- Select the product category. These are defined in the configuration > Point ‘3.B.’
- Select the called party’s customer type under ‘Voice parameters’. This customer type is not the customer type of the persons making the call but rather the person receiving the call or SMS. If the package is applicable to all people the customer sends the SMS to, then select ‘ALL’
- Go to the controls under ‘Voice parameters’ and select the call types that are covered by the package. Typically this would be something like SMS. Call types are defined under the configuration page or a supplier account, in the ‘Call types’ tab. Also, write the number of SMS the package includes. Finally, tick ‘number of calls’ under ‘Package is defined as’.
- Enter the package purchase price, sales price and possible discount
- Click ‘Save’
- Go to the customer’s account under the ‘Home’ menu >Menu at top right-hand corner > ‘Subscriptions and packages’
- We now need to add a sale to the customer’s account. Follow the steps detailed here for this. Instead of selecting ‘Subscriptions’, select ‘Packages’ and select the SMS package under ‘Item name’. Fill in the rest of the boxes and add the package under the ‘Actions’ menu
- Once added, click the package and click ‘Associated SNs’ to link specific phone numbers with the package
The above process can be used to create and add any package with a customer.
Bill a SMDR/CDR format not using price lists but the price information contained in the file
A package needs to be created and linked to a customer. We’ll assume a customer account has been created and their phone numbers haves been added to their account. Follow the steps given below to create the package and link it to this customer:
- Go to a supplier account to add or modify a SMDR/CDR format. Select/add the SMDR/CDR format
- In the import wizard, when you get to the step where the portal asks how the SMDR/CDR data should be rated, select using a purchase price from the SMDR/CDR data and a margin multiplier or using a sales price column. For the latter you will be asked to identify a default margin multiplier. Go to the end and click ‘Finish’
If you wish to build packages based on the above, two extra steps are required. Because the portal will not use the call types from price lists, it still requires that call types be identified but this time from the SMDR/CDR data. Any piece of data in any column can constitute a call type. Call types on the other hand will have to be meaningful if you wish to identify the time of day and day of the week for peak/offpeak billing. Step required is to:
- Still in the wizard, but in the step where fields are mapped, identify a column for call type
- Add the call types that define the calls that fall within the package in the configuration page, last tab
Finally as you would if you were billing from price lists, go to the packages page in the Data menu and add the packages required using the newly added call types. Go to your customer’s accounts and add the newly added packages to their accounts.
Show how SMDR/CDR reconciliation is done
One has to define a purchase cost for the SMDR/CDR data which will serve as the expected cost from the suppliers, as follows:
- If you defined that SMDR/CDR are rated using price lists when you originally imported the SMDR/CDR format, SNs are then associated with purchase price lists under each customer’s account (SN pages).
- If SMDR/CDRs are rated using a purchase price column from the SMDR/CDRs, the portal will use this as the purchase (or cost) price of calls to your company. When the SMDR/CDR is imported via a supplier account, make sure you indicate that SMDR/CDRs hold this and identify which column holds this piece of data during the process of importing the SMDR/CDR format.
TelecomBilling.Net then stores your costs in specific fields in the database table that stores rated SMDR/CDRs. These tables are called VoiceSMDR/CDRData, DataSMDR/CDRData and ServiceSMDR/CDRData and are used for storing rated data for voice, data and services respectively:
- Voice SMDR/CDR:
- Calculated_Call_Cost: expected cost of SMDR/CDR from supplier as calculated by your portal if billing is done using price lists
- Carrier_Call_Cost: actual cost billed by supplier if billing using data from the SMDR/CDRs
- Customer_Call_Cost: cost to customer
- Data SMDR/CDR:
- Calculated_Package_Cost: expected cost of SMDR/CDR from supplier as calculated by your portal
- Carrier_Package_Cost: actual cost billed by supplier if billing using data from the SMDR/CDRs
- Customer_Package_Cost: cost to customer
- Service SMDR/CDR:
- Calculated_Service_Cost: expected cost of SMDR/CDR from supplier as calculated by your portal if billing is done using price lists
- Carrier_Service_Cost: actual cost billed by supplier if billing using data from the SMDR/CDRs
- Customer_Service_Cost: cost to customer
You also have the equivalent profit fields in that table. You then have a financial report that gives you, sales price of SMDR/CDRs and expected costs. Report is called ‘Revenue assurance and profit’.
Dynasoft LTD
Copyright © 2007 – 2024